
How to Create a Facebook & Instagram Ads with ToneDen for Music
A step-by-step guide on how to create a Facebook Advertising campaign with ToneDen.
How to Create a Facebook & Instagram Ads with ToneDen for Music
This is a step-by-step guide on how to create a Facebook Ad campaign to promote your next single, EP, or album.
You can create a Facebook Advertising campaign on ToneDen by visiting the Advertising tab in Campaigns.

Step 1: Edit Objective
Choose Your Advertising Objective
Begin by choosing your Advertising Objective.
This determines the type of Facebook Ad campaign that is created.

Choosing the Get people to visit a webpage or app will give your campaign a Traffic or Conversion objective.
Choosing the Get people to engage with your post or page will give your campaign an Engagement or Video Views objective.
Choose Campaign Target
The next step is to choose your campaign target.
This is the destination fans will get sent to after clicking on or swiping up on your ads.
The Custom Link option allows you to input a link to any web address. This could be a direct link to your song on Spotify, a music smart link, a ToneDen FanLink, or any web address.

[Optional] Using an Existing FanLink
We also provide the option for users to select a FanLink they've created in their campaigns. This can be done through the FanLink tab.

[Optional] Using an Existing Facebook Post
We also provide the option for users to use an existing Facebook Post in their campaigns. This can be done through the Facebook Post tab.
You can then choose a Facebook Page & select a post ID from the dropdown. If you don't see your post, you can input the Facebook Post ID.

Step 2: Select Accounts
Select a Facebook Advertising Account
The select account section lets you choose which ad account you would like to use.
You can choose which Facebook Ad Account you'd like to advertise from by clicking the drop-down menu below “Select A Facebook Advertising Account.”

The Facebook Ad Account you choose will be where your ad campaign appears in Facebook Ads Manager. It will also be the ad account that is billed.
Choose a Facebook Page
Select the Facebook & Instagram pages from where you'd like your ads to run.

You can select any page that you have page advertiser access to in this field.
If a page doesn't show up, make sure that you have advertiser access to it on the personal Facebook account you've linked with your ToneDen sub account.
How to Request Page Advertiser (or Admin) Access to a Brand[Optional] Choose an Instagram Page
We'll automatically use the Instagram account connected to the Facebook page you select in the step above.
Feel free to leave this section blank unless you'd like to select a different Instagram account than the one already attached to your page.
What if my Facebook Page or my Ad Account isn't Appearing?
The Pages & Ad Accounts assigned to your Facebook profile will appear in the Select Accounts section.
If you're having trouble seeing the right Facebook Pages or Ad Accounts, please refer to this article to double check which Facebook Profile is synced to ToneDen:
How to sync your Facebook profile to ToneDen for AdsStep 3: Modify Target Audiences
You can choose who sees your ads in the Modify Target Audiences section.
There are two user interfaces: a Simple Targeting interface & and an Advanced Targeting interface.
The Simple Targeting user interface is designed for fast campaign creation. It also covers targeting new and existing fans.
Simple Targeting: Customize Your Interests
Use the Customize Your Interests to target interests on Facebook or Instagram.
Typing interests into the Generated Interests section determines who you target on Facebook.
Clicking the dropdown arrow after typing in an interest provides recommended interests to target.
The Select Streaming Platforms section allows you to target users of a particular streaming service on Facebook or Instagram. Please make sure to only include streaming services you are trying to grow on.
Simple Targeting: Generate Interests from Spotify
Or you can use the Generate Interests from Spotify tab to use Spotify's API to build better audiences.
Type in the name of your artist on Spotify in the Select Artist Section.
ToneDen will then add your artist profile and 2 other similar artists from Spotify.
You can choose to add or remove artists if the artists shown are not a good fit
ToneDen will then query the Fans Also Like section of Spotify for these artists to find interests to target.
These interests will then appear in the Generated Interests section below.
You can choose to add or remove interests if the interests shown are not a good fit.
The Select Streaming Platforms section allows you to target users of a particular streaming service on Facebook or Instagram.


Locations
The Locations field allows you to choose where your ads are served.
The Global option allows you to target fans world-wide.
The English-Speaking option allows you to target countries where English is the primary language.
The Custom option allows you to target specific countries and cities.
Advanced Targeting
The Advanced Targeting option allows you to build and add multiple audiences to your campaigns.
You can get an overview of it here:
Creating Target Audiences with Audience BuilderAdding Audiences with Audience Builder
Press the “Add New” button to add an audience.
After pressing “Add New,” select an "Audience Template” for your audience in the “Audience Builder” section.
Audience Templates are designed to give you a quick way to target a particular type of person on Facebook or Instagram.

Different Audience Templates provide different targeting options.
You can pick Audience Templates in the “Recipes” column. There are different Audience Templates depending on which data source you choose from the “Ingredients” column.
For example, the “Facebook Interest Audience” template in the Facebook Ingredients data source allows you to create an audience of all Facebook users narrowed by specific interests of people on Facebook.
The “Facebook Page Likes” template in the Facebook Ingredients data source allows you to create an audience of individuals who are “connected” to your Facebook Page.
Configuring an Audience Template
After choosing an audience template, your new audience will appear in the section below “Modify Target Audiences."
You can configure the audience template further by clicking on the audience box, which will prompt a menu to appear to your right.
For example, if you’re using the “Facebook Interest Audience” Audience Template, you can skip immediately to the “Advanced Targeting” section and begin typing interests in the field below the “Find people who share at least ONE of the following Interests” text.

The estimated size of that audience will be found in the center column below the name of the audience in a section titled “Approximate Size.”
If you’re using a different template, you'll need to configure “Template Options” before the audience is ready for use.
For example, with the “Facebook Custom Audience” Audience Template, you can choose which custom and/or saved audiences you'd like to import from Facebook or directly upload a CSV of a contact list.
Removing Audiences, Duplicating Audiences, or Changing an Audience Template
If you'd like to remove an audience from your campaign, you have two options:
Click on the trashcan icon in the top right corner of the audience box located in the “Modify Target Audiences” column
Click on the “Remove” text located in the right-hand column that you use to configure the Audience Template

If you'd like to duplicate an audience, you have two options:
Click on the folded papers icon in the top right corner of the audience box located in the “Modify Target Audiences” column
Click on the “Duplicate” text located in the right-hand column that you use to configure the Audience Template

To change an audience template without deleting the audience, click on “Change Template” in the right-hand column that you use to configure the Audience Template.

Using and Saving Sets
In the habit of using multiple audiences for every ad campaign that you launch? Save time with Sets.
A Set is a group of multiple target audiences that are included in an ad campaign.
If you notice that you use a similar group of audiences for the majority of your campaigns, you can save that group as a Set by clicking on the “Save Set” button at the top of the “Modify Target Audiences” column.


If you use this set in the majority of campaigns you create, you can also check the box that says “Make Default Set for New Campaigns” so that the Set will automatically appear when making a new campaign.
Step 4: Set Schedule
Start Date
Choose the day you'd like your ad campaign to begin by selecting the “Please select a start date” field.
Choose the time you'd like your ad campaign to begin by selecting the “Select a start time” field.
End Date
Choose the day you'd like your ad campaign to end by selecting the “Please select an end date” field.
Choose the time you'd like your ad campaign to end by selecting the “Select an end time” field.

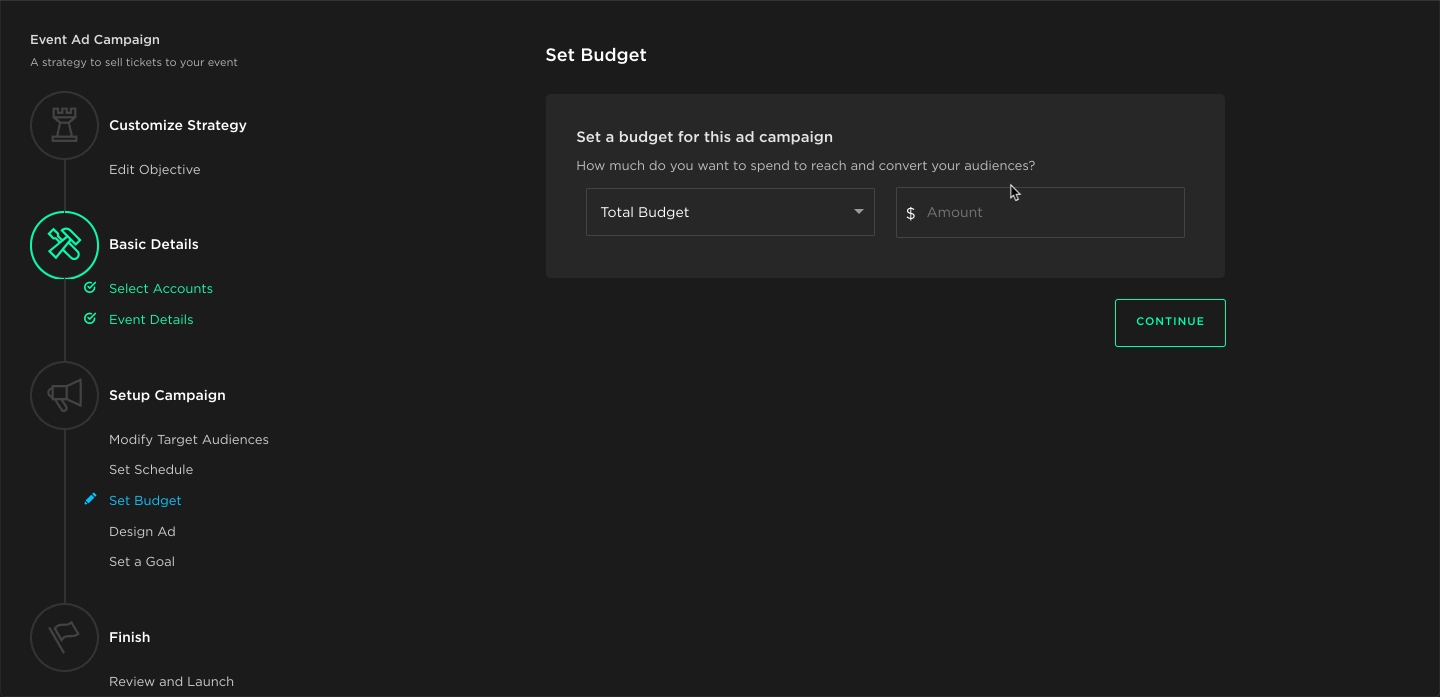
Step 5: Set Budget
This is where you can determine how much money to spend on your Facebook Ad campaign.
Use Total Budget if you don't plan to frequently adjust the budget of your campaign once it's launched.
The Total Budget option spends your entire budget during the time set in the Set Schedule step.
For example, a four-day campaign with a $100 Total Budget will spend $25/day.
Use Daily Budget when you plan to frequently adjust the budget of your campaign once it's launched.
The Daily Budget option spends your budget daily.
For example, four-day campaign with a $25 Daily Budget will spend $25/day for a total of $100.
Step 6: Design Ad
Choose how your ad(s) will appear on Facebook and/or Instagram by customizing each part of your ad below.
Image/Video
The Image/Video section allows you to choose what image or video you would like fans to see.
You have multiple options to add images and videos:
Use images or videos you’ve used in your past ad campaigns by using the “Ad Account Library” option
Use images or videos you’ve uploaded to your Facebook Page by using the “Facebook Page Library” option
Upload a new image or video by pressing the “Upload New Image” option
Design your own using ToneDen's Canva integration

Recommended Image specs include:
1,080 x 1,080 pixels 1200 x 628 pixels
To maximize ad delivery, use an image that contains little or no overlaid text.
Video Recommendations include:
Recommended Length: Up to 15 seconds
Recommended Aspect Ratio: Vertical (4:5)
Video Specifications include:
Recommended format: .mp4, .mov or .gif
Required Lengths by Placement:
Facebook: 240 minutes max Instagram Stories: Up to 60 seconds Instagram Feed: Up to 60 seconds
Resolution: 600px minimum width
File size: Up to 4GB max
Creating Multiple Variations of Your Ads
The service will test every combination and find the ad creative your audiences respond to best.
You can create multiple variations by adding more than one creative variant to a creative section.
For example, if you already have an image and then press Add Image, the service will create two different ads for the campaign.

Ad Preview
The ad preview will show you what your ad will look like based on the creatives you selected. You can see how your ad will look on different platforms by pressing the respective platform’s icon below the ad preview.

Post Text
The post text section allows you to include text that clearly tells people about what you are promoting.

Headline
The headline section allows you to add a brief headline to let people know what your ad is about.
The character limit for the headline is 40. You can add more text and go over the character limit, but it may be cut off when people see your ad in certain placements.

Link Description
The Link Description section allows you to add additional text to emphasize why people should interact with your ad. This won’t appear in all placements.

Call to Action
The Call to Action section allows you to choose the action you want people to take when they see your ad.
There are several different Call to Action buttons you can choose from.

Step 7: Select a Goal (Optional)
If you have a verified custom domain that's been connected to ToneDen, you are able to see this last step where you can select the specific action you want to Facebook Ad campaign to optimize for. Your event will determine how ToneDen will optimize your campaign’s budget while your ads are live.
Remember: you need to own your domain to take advantage of conversion tracking. Otherwise, all campaigns will default to link click optimization. Owning your domain is the key to maximizing the benefits of the Facebook pixel. Here's a step-by-step guide to creating your custom domain and connecting it to ToneDen:
A Guide To Setting Up Your Own Domain For Custom ConversionsYour event will determine how ToneDen will optimize your campaign’s budget while your ads are live.

You’ll get the best results when selecting an event that aligns with what you'd like to happen as a result of your ads.
Last updated
Was this helpful?